Customizing Barcode Label Print Preferences
A new option for customizing the barcode location has been added to Label Preferences. This option lets you customize the print preferences for Barcode and/or Auxiliary labels for Daily Laser and Half Labels. You have the option to select the number of barcoded auxiliary labels that will be printed for each prescription, as well as the print location of each barcode. This feature is useful if your auxiliary labels range from lighter to darker colours; choose to print the barcode on a light colour label, as the imaging scanner will not be able to read a barcode on a dark background (i.e. a barcode on a dark red label cannot be read).
Note: The barcode auxiliary labels are only available on the Daily Laser Label and Half Label.
Daily Laser Label
To set up the Barcode print preferences for the Daily Laser labels:
- Select More > Pharmacy > Rx Detail tab.
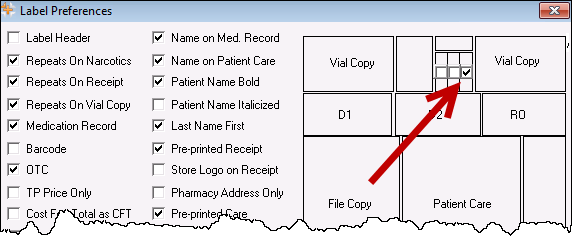
- In the Label groupbox, press or click the Daily Laser button. The 'Label Preferences' window appears.
- Select any of the following checkboxes located on the top right corner, beside Vial Copy.
- Left checkbox: Select this checkbox to print the Barcode on the top left side of a Daily Laser label
- Middle checkbox: Select this checkbox to print the Barcode on the top middle of a Daily Laser label.
- Right checkbox: Select this checkbox to print Barcode on the top right side of a Daily Laser label.
- All checkboxes: Select this checkbox to print only the Barcodes on a Daily Laser label; the clinical auxiliary information will NOT print.
- Select the OK button.
Half Label
To set up the Barcode print preferences for the Half Labels:
- Select More > Pharmacy > Rx Detail tab.
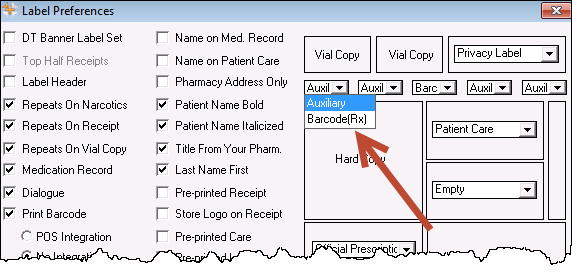
- In the Label groupbox, select the Preferences button. The 'Label Preferences' window appears.
- Choose the desired label type (Auxiliary or Barcode Rx) from the dropdown menus located under Vial Copy.
- Auxiliary prints standard clinical information
- Barcode (Rx) prints the imaging barcode
- Select the OK button.